Agents in Production: Build an AI Chat App with Shiny and {shinychat}
The agent we built in part 1 lives in an R console, which suits one person. A trial team needs an app in the browser, where several people can ask questions at once without seeing each other’s conversations.
This is part two of a five-part series on putting AI agents into production with R. Each part builds on the same app, a clinical trial safety assistant. The parts are:
- From Chatbot to Agent
- Putting the Agent in a Shiny App (this post)
- Can You Trust It?
- Audit Trails, Costs and Models
- Sharing Your Tools with MCP
As a reminder, the agent answers questions about a clinical trial’s safety data with a model, four tools and a loop. The model chooses which tool to call, and the tools do the counting in R. The model is also told never to do the maths itself, and part 3 checks that. (Part 1 also explains the trial terms.)
In this post we:
- build a chat app around the agent with {shiny} and {shinychat}
- give every user their own conversation, and test it
- show the agent’s tool calls in the chat
- stop files being uploaded to the model
- handle the model being slow or unavailable, and deploy to Posit Connect
What is {shinychat}?
{shinychat} is Posit’s package of chat components for Shiny, and we need two of them. The chat window comes from chat_ui(). Behind it, chat_server() connects the window to an {ellmer} chat client. It sends each question to the model, streams the answer back and shows each tool call as it happens.
The client is the one part 1’s make_agent() builds, so the tools, the system prompt and the loop all carry over unchanged. If you’ve used chat_mod_ui() and chat_mod_server() before, {shinychat} 0.5.0 soft-deprecates them in favour of these two.
The app
We keep the page in its own function, app_ui(), so that tests can check it without starting the app:
GREETING <- paste(
  "Ask me about adverse events in CDISC pilot study 01: a xanomeline skin patch at two doses, against placebo.",
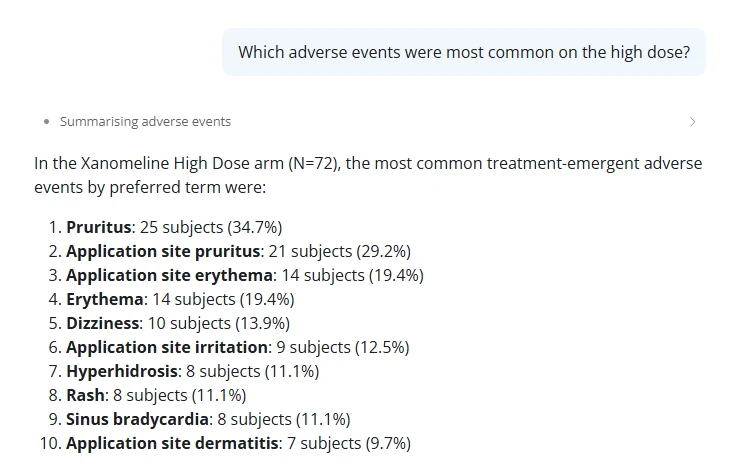
  "For example: *Which adverse events were most common on the high dose?*",
  "I only know this trial's safety data, and I can't give medical advice.",
  sep = "\n\n"
)

app_ui <- function() {
  bslib::page_fillable(
    title = "Trial safety assistant",
    shinychat::chat_ui(
      "chat",
      greeting = GREETING,
      placeholder = "Ask about the trial's adverse events",
      allow_attachments = FALSE
    )
  )
}
The greeting tells people what the assistant is for. It only sets expectations, though. The rule against medical advice goes into the system prompt in part 3, where we also test that the agent keeps it.
The app itself is short, because the work happens in the files in R/: part 1’s, plus four new ones (ui.R, display.R, wrap.R and attachments.R), which Shiny sources before app.R runs:
library(shiny)
library(bslib)
library(shinychat)

# shinychat writes a failed answer's error into the chat. Sanitised, it says
# "An error occurred" instead of showing the provider's raw message.
options(shiny.sanitize.errors = TRUE)

# Shiny sources every file in R/ before this runs.
trial_data <- load_trial_data()

ui <- app_ui()

server <- function(input, output, session) {
  # One client per session. A client made outside server() would share one
  # conversation between every user.
  client <- make_agent(tools = with_display(trial_tools(trial_data)))
  refuse_attachments(client)
  chat <- chat_server("chat", client, history = FALSE)

  observeEvent(chat$last_error(), {
    error <- chat$last_error()
    message <- if (inherits(error, "trial_attachment_refused")) {
      conditionMessage(error)
    } else {
      "The assistant couldn't answer just now. Please try again in a minute."
    }
    showNotification(message, type = "error", duration = NULL)
  })
}

shinyApp(ui, server)
For each person who opens the app, server() does four things:
- It makes them their own chat client.
make_agent()builds it with the four tools, each wrapped bywith_display()so that its results read well in the chat. - It checks every request before it goes to the model, with
refuse_attachments(). - It connects the client to the chat window. That’s
chat_server(), with its built-in conversation history turned off (history = FALSE). Left on, {shinychat} 0.5.0 saves every conversation as files on the server, patient records included, outside the audit log and any retention rule, and asks the model to title each one. Part 4 keeps one record instead. - It tells the user what to do if a question fails, by watching
chat$last_error().
The data is loaded once, outside server(), and shared by every session. That’s safe because nothing changes it.
To run the app, get this part’s folder as in part 1 and open it as a project. Your key doesn’t come with it, since git ignores .Renviron, so copy that file across from part 1’s folder.
Then run renv::restore(), which is quick because {renv} reuses the packages it installed before, or install the new ones with install.packages(c("shiny", "shinychat", "rsconnect")). Finally, call shiny::runApp().
One conversation per user
An {ellmer} chat client sends the conversation so far with each new question. That’s what makes follow-ups work, and it means a client belongs to one person.
Shiny runs one R process for many users, and it calls server() once for each browser session. Anything created inside server() belongs to that session, while anything created at the top of app.R is shared by everyone.
So a client created at the top of the file puts every user in the same conversation. The second person to arrive can ask “what did I just ask?” and get the first person’s question back.
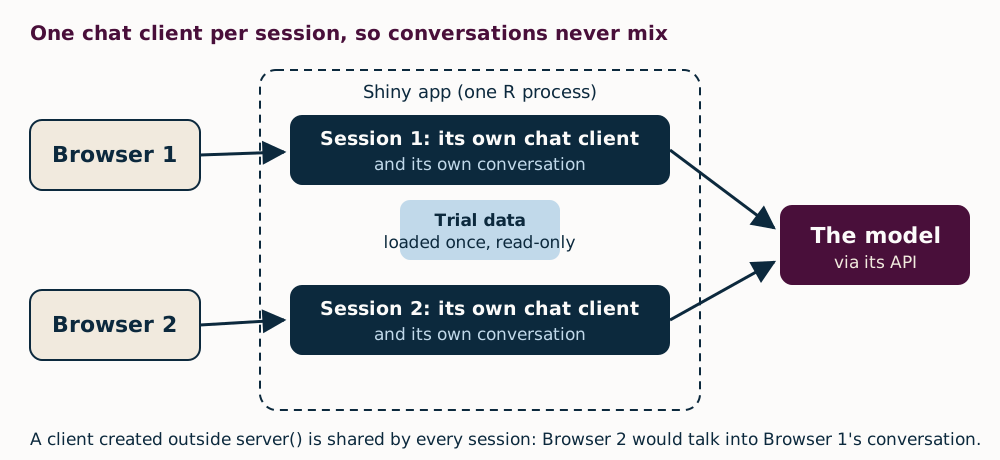
You won’t catch this by trying the app on your own, so we test for it. Shiny’s testServer() runs the server function without a browser. Our test builds one app with shiny::shinyAppDir(), runs testServer() on it twice, and checks that the two sessions never share a chat$client.
For the browser tests that go alongside testServer(), see our series on {shinytest2}.
test_that("two sessions never share a client", {
  withr::local_envvar(GEMINI_API_KEY = "test-key")
  # One app, as on a server: both sessions run inside it. Given a folder,
  # testServer() builds a fresh app each time, which would hide a shared client.
  app <- shiny::shinyAppDir(test_path("..", ".."))
  seen <- new.env()
  for (i in 1:2) {
    shiny::testServer(app, assign(paste0("client", i), chat$client, envir = seen))
  }
  expect_false(identical(seen$client1, seen$client2))
})
Showing the work
{shinychat} shows the tool calls as rows above the answer. Each row takes its title from the tool_annotations(title = …) we gave the tool in part 1, such as “Counting subjects” or “Summarising adverse events”. Opening a row shows what the agent asked for and what came back, so a trial team can check where a number came from.
By default, calls to the same tool share one row, which lists each call when you open it. Set tool_grouping = "none" in chat_ui() to give every call its own row.
The raw results are JSON, which suits the model but is hard for people to read. So with_display() wraps each tool, and people see a readable table while the model still gets JSON:
with_display <- function(tools) {
  lapply(tools, function(tool) {
    wrap_tool(tool, function(run, args) {
      value <- run()
      # The display is for people. If it can't be built, the model still
      # gets its answer.
      markdown <- tryCatch(result_markdown(value), error = function(e) NULL)
      if (is.null(markdown)) return(value)
      ellmer::ContentToolResult(
        value = value,
        extra = list(display = shinychat::tool_result_display(markdown = markdown))
      )
    })
  })
}
Two helpers do the work. The first, wrap_tool() in R/wrap.R, copies a tool so that every call goes through a function we give it. Inside that function, run() calls the original tool and args holds the arguments the tool will run with, including any defaults the model left out.
The second, result_markdown() in R/display.R, turns the JSON into a table or a list. We use wrap_tool() again in part 4, for the audit log.
Not every tool returns JSON. The handover tool in part 3 returns a plain sentence, and our first version of the display broke on it, taking the whole tool call down too. It now falls back to plain text.
No file uploads
By default, chat_server() allows file uploads. People can attach a CSV file, a PDF or an image, and it goes straight to the model. That undoes part 1’s design. The model would read raw data itself instead of asking our tested tools, and the whole file would go to the provider, when a question only needs a few numbers.
Setting allow_attachments = FALSE in chat_ui() only hides the upload button, and anyone can send a request without using the page. So the server checks every request as well. It refuses any user turn that holds more than typed text and tool results ({ellmer} sends tool results back as user turns).
Text files need one more check. {shinychat} sends a CSV or TXT file as plain text in a <file-attachment> wrapper, so the check refuses that too. {ellmer} builds turns and their contents as S7 objects, so the code tests their class with S7::S7_inherits() and reads their fields with @:
attachment_check <- function() {
  allowed <- function(content) {
    if (S7::S7_inherits(content, ellmer::ContentText)) {
      # shinychat sends a text file (CSV, TXT, JSON and so on) as text in a
      # <file-attachment> wrapper, so text can be a file too.
      return(!grepl("^\\s*<file-attachment ", content@text))
    }
    S7::S7_inherits(content, ellmer::ContentToolResult)
  }
  function(turns) {
    for (turn in turns) {
      if (S7::S7_inherits(turn, ellmer::UserTurn) && !all(vapply(turn@contents, allowed, logical(1)))) {
        rlang::abort(
          "Files can't be sent to this assistant. Ask your question as text.",
          class = "trial_attachment_refused"
        )
      }
    }
  }
}

refuse_attachments <- function(chat) {
  chat$on_request_start(attachment_check())
}
The check can’t stop someone pasting a file’s contents into the question, because no check can tell pasted data from a question. So what limits the risk is who can open the app and which provider you send text to, and part 4 covers both.
When the model is down
As we saw in part 1, Gemini’s free tier often answers “503: high demand” or “429: quota exceeded”. When the provider is busy or rate-limited, {ellmer} tries each request up to three times, waiting longer each time, and options(ellmer_max_tries = 5) allows more.
If the last try fails, chat$last_error() fires. The chat shows {shinychat}’s generic line, “An error occurred. Please try again or contact the app author.”, and our notification tells the user what to do. Our post on dynamic alt text shows the same idea outside a chat app, with tryCatch() and a fallback.
Two users at once
R does one thing at a time. If one person’s 20-second question blocked the R process, everyone else’s app would freeze until it finished.
{shinychat}’s chat_server() avoids that. It streams each answer with {ellmer}’s asynchronous stream_async(), inside a Shiny ExtendedTask, so R keeps serving other sessions while one waits for the model. Tool calls still run one at a time in the shared process, so keep your tools quick. Ours take milliseconds.
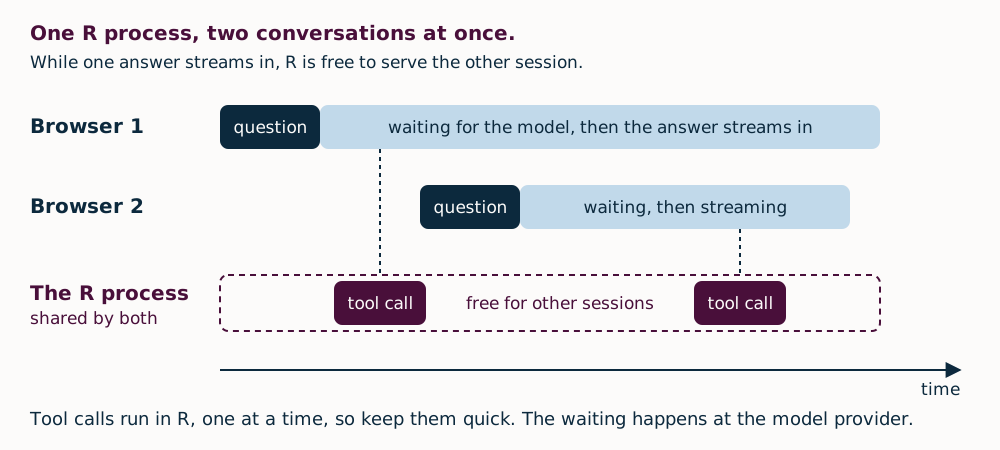
To check by hand, open two browser windows. Ask in the first and, while its answer is still arriving, ask in the second. The second answer should start straight away. Our Shiny in Production 2025 summary has more on asynchronous Shiny.
Deploying to Posit Connect
Posit Connect runs Shiny apps for a team, with sign-in and access control.
Treat this first deploy as a private test. The free tier is fine for this public data, but not for your own patient or confidential data. And an app offered to users in the UK, the EEA or Switzerland must use Google’s paid service, as part 4 explains.
This version also lets anyone who can open the app see patient records, and it keeps no log. Parts 3 and 4 fix both.
You register your Connect account once, and the code’s README has the steps. After that, deploying is one call from the project folder. The appFiles argument lists what goes into the bundle: the app, the R/ folder and the system prompt. Tests and local files stay behind.
rsconnect::deployApp(
  ".",
  appFiles = c("app.R", list.files("R", full.names = TRUE), "prompts/system.md"),
  appName = "trial-safety-assistant",
  envVars = "GEMINI_API_KEY"
)
The API key never goes in the code or the bundle. Instead, envVars copies it from your R session, which read it from .Renviron, into the app’s Vars panel in Connect, over an encrypted connection, before the app first starts. Every later deploy copies it again, so change the key in your .Renviron as well as in the panel.
Beyond a private test, use a key from your organisation’s own account, under its paid terms, rather than your personal one.
To deploy on every push instead, see Keith’s post on GitHub Actions deployments to Posit Connect Cloud, or use git-backed publishing on your own Connect server.
We deployed it to our own Connect server, version 2026.06.1, and repeated the two-window check there. Each window kept its own conversation.
The bundle held only the nine files listed. Because the folder has an renv.lock, though, {rsconnect} took the package list from it, so Connect installed all 100 packages in the lockfile, including those only the tests use. That makes the first deploy slower, but it does no harm.
Summary
The agent from part 1 is now an app that several people can use at once. Each person gets their own conversation, and the tool calls are visible. File attachments are refused, a failed question tells the user what to do next, and the app runs on Posit Connect.
Before you share it, run through Tim’s five pre-flight checks for your dashboard. They apply to a chat app too.
Next time, we take on the question every trial team asks first: can you trust it? We’ll test the tools, evaluate the agent and check where every number in an answer came from. We’ll also let only reviewers open a patient record, and have them confirm each one.
All the code for this part, including the app and its tests, is in our blog repository.
If you’re building AI tools with Shiny, come and talk about it at AI in Production 2027, where the call for talks is open until 29 January 2027. Our LLM-Driven Applications with R and Python course also covers adding a chat to a Shiny app.