Creating a Python Package with Poetry for Beginners
Intro
In this blog series (this and the next blog) I am going to demonstrate how to use Poetry to create a Python package, set up testing infrastructure and install it. I am going to be creating a wrapper around the Fantasy Premier League API and creating a function which can create a weekly league table.
Before we look at creating a package, why might we want one? There is a multitude of reasons for wrapping your code up but to me the main three are:
Code wrapped up in a package is reusable, meaning we just need to install the package to use the exported functions instead of copy-and-pasting or reimplementing the same code in your projects.
The code is very easy to share once wrapped up in a package. Just publish to a package index or share the repository privately and other people will be able to use it.
Maintenance of a package is also very easy with all the development tools available. Centralisation of bug fixes, updates, documentation, testing and more will make your life a whole lot easier.
We will come back to the value of distributing a package later in the blog series. When a publishable package is ready, it can be published in the Python Package Index (PyPI) and from here it can be installed by other users.
Set Up
The first thing you’ll need to do is come up with a name for your package (often the hardest bit)
and then we will use Poetry to create the initial infrastructure. Note that other packaging and
dependency management tools are available like Setuptools,
Flit or Hatch.
As I said though in this blog we are focusing on Poetry so once we have a name for the
package (my package for this blog is called fpl-league) we can run:
poetry new fpl-league
This will create a directory called fpl-league with the structure:
fpl-league
├── poetry.lock
├── pyproject.toml
├── README.md
├── src
│   └── fpl_league
│       ├── get_league.py
│       └── __init__.py
└── tests
    └── __init__.py
The purpose of these files is as follows:
pyproject.toml- A kinda config file for your package, contains information like name, version, author, license and any dependencies or build tools used.README.md- Not python specific, just a file containing an overview of how to use / install the package and any other relevant information.src/- This directory will contain any of the actual source (src) code of your package.tests/- Contains any code or data used for testing your package.__init__.py- This file marks the presence of python code and is used to control what gets exported from your package. You’ll notice there is one of these intests/andsrc/, the use is similar in each but intests/it makes code importable for testing and insrc/it makes code importable for users of the package.
Note: Testing will be covered briefly in the next blog and we also have some other blogs on the subject like ‘First Steps in Python Testing’ and ‘Advanced Testing in Python’.
Okay we’ve now got the skeleton of our package! Here is where we start fleshing things out. I
know that for my package I’m going to be querying an API with the requests
package. That means requests should be a dependency of my package, and that anybody who wants to use my
package will also need requests installed.
To add requests as a dependency of my package we are again going to turn to Poetry and run poetry add whilst at the
root level of the package:
poetry add requests
This will update our pyproject.toml to include requests as a dependency and create a new file called
poetry.lock which contains all dependencies and sub-dependencies of our package with exact versions.
The poetry.lock file is helpful for ensuring the code will work on any machine whilst developing the package.
Here is what the toml file will look like after adding requests:
[project]
name = "fpl-league"
version = "0.1.0"
description = ""
authors = [
    {name = "osheen1",email = "osheen@jumpingrivers.com"}
]
readme = "README.md"
requires-python = ">=3.10"
dependencies = [
    "requests (>=2.32.5,<3.0.0)"
]

[tool.poetry]
packages = [{include = "fpl_league", from = "src"}]


[build-system]
requires = ["poetry-core>=2.0.0,<3.0.0"]
build-backend = "poetry.core.masonry.api"
The change made here is the dependencies field has been updated to include requests.
Python Environments
Python Environments could be a blog post by itself so I will only cover the background briefly and why it’s important for package development. If you want to learn more about what they are, check out this Jumping Rivers blog comparing Python Environments and Barbie is helpful and if you want to know if you should be using one, this StackOverflow question should tell you.
A Python Environment or virtual environment (venv) is similar to any kind of environment in the data science world: it is a box where you have exactly what you need installed for the specific project it’s associated with. During package development using a venv ensures the reproducibility of the development environment across a team, as all developers will be using the same package versions. Like with everything in Python there are multiple packages and ways to set up a venv like venv or pipenv, but for this blog we are sticking with Poetry.
To use a virtual environment while developing your package:
poetry install
This will ensure all package dependencies are installed.
poetry env activate
This will give you a command to activate the venv, a source call to the path of the activation file for the venv. Alternatively you can run this which will also evaluate the command returned:
eval $(poetry env activate )
Once you have activated the venv your terminal will display the name of that environment in brackets like this:

We can test the venv by ensuring the packages installed are the same as the poetry.lock
file by entering a Python session and looking at package versions vs system versions.
As I have only installed requests at this point:
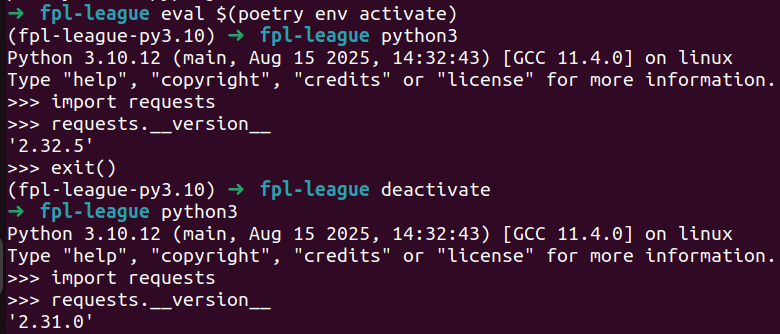
See when I enter the venv I am using the package dependency of “requests (>=2.32.5,<3.0.0)”
which is defined in the pyproject.toml and poetry.lock files rather than my system version
which is “2.31.0”.
Then to exit the venv you can use:
deactivate
Adding a Function (& Intro to FPL)
Now we’ve learnt a bit about developing a Python package, the next thing to do is add the one and only function I’ll be putting in this package. The function I’m adding will be a wrapper around the Fantasy Premier League API. If you don’t already know fantasy premier league (FPL) is an online game where you and other players pick real life footballers in a team and you score points based on actions in the real life games, more information can be found on the website. There are multiple endpoints available for accessing things like player data and fixture difficulty (great summary of the API here), in fact there is an existing Python package which uses them, check that out here.
I am focusing on something that is not covered by the other packages (as far as I’m aware) and that’s the league data. There is an endpoint for accessing the league table if you know your unique league ID:
https://fantasy.premierleague.com/api/leagues-classic/league_id/standings/
However, I want a summary of the league across the season so I can see progression throughout. This data could then be used to create some season summaries. Conveniently, at the time of writing I am at the top of the league I’ve entered with my friends, so I will appear at the top of the dataset my that function will return.
To actually add my function I’ll create a file in src/fpl-league called get_league.py and in here I’ll define my function
along with any packages I’ll need to run it:
import requests
import pandas as pd
import json

def get_season_league(league_id = "485842"):
    api_url = "https://fantasy.premierleague.com/api/"
    url = api_url+ "leagues-classic/" + league_id + "/standings/"
    response = requests.get(url)
    data = json.loads(response.text)
    league = pd.DataFrame(data['standings']['results'])

    df = pd.DataFrame([])
    for index, row in league.iterrows():
        player_query = api_url + "entry/" + str(row['entry']) + "/history"
        player_response = requests.get(player_query)
        player_data = json.loads(player_response.text)
        player_df = pd.DataFrame({
            'name': row['player_name'],
            'team_name': row['entry_name'],
            'event': pd.json_normalize(
                player_data['current']
            )['event'],
            'points': pd.json_normalize(
                player_data['current']
            )['total_points']
        })
        df = pd.concat([df, player_df])
    return df
Without going into too much detail on the code, I am querying the API to get the current standing of the league, then mapping over each player and grabbing their weekly scores. The final output should have 5 rows (as there has only been 5 gameweeks so far) and look like this:
| name | team_name | event | points |
|---|---|---|---|
| Osheen Macoscar | What’s the Mata? | 1 | 69 |
| Osheen Macoscar | What’s the Mata? | 2 | 137 |
| Osheen Macoscar | What’s the Mata? | 3 | 202 |
| Osheen Macoscar | What’s the Mata? | 4 | 284 |
| Osheen Macoscar | What’s the Mata? | 5 | 337 |
Using the Function
Now we’ve defined our function in the package, to use it we must enter the virtual environment and import our function from the module:
from fpl_league.get_league import get_season_league
We can also edit the __init__.py so we don’t need to explicitly load the function from the get_league module. So if we
add the above code to the __init__.py file then all we need to do to load the function is:
from fpl_league import get_season_league
This makes it easier for users as they won’t have to remember the module name and have to type a little bit less.
Next Up
So far we’ve covered creating our package with Poetry, managing our development environment and adding a function. In the next blog post we’ll be covering the next steps with package development including documentation, testing and publishing to PyPI.